Usage
Command-line interface halostack_cli.py to Halostack libraries is
available in the bin/ directory. There is also a very simple
example how to generate B-R processed image, halostack_br.py.
Basic usage
As a first step, we’ll show how the alignment reference is selected from the first image in the stack. To start, issue the following command:
$ halostack_cli.py -a average_stack.png *.jpg
You’ll get a new window showing the first image:
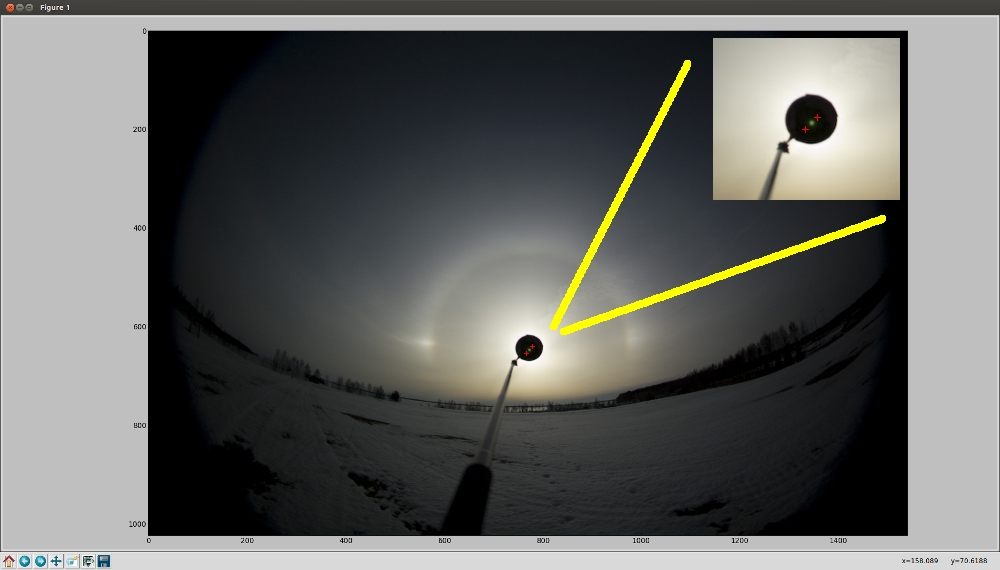
It is usually helpful first to expand the window to full screen.
From the image, we need to click the two corner points of the area having the Sun. These points are marked with plus-signs, and the image will be closed after the second point has been selected. Try to select the points so that the area is as tightly around the Sun as possible, but still so that there’s some black from the blocker included in the area.
Simililarly, we need to select the area where this reference area will be searched from in the following images:
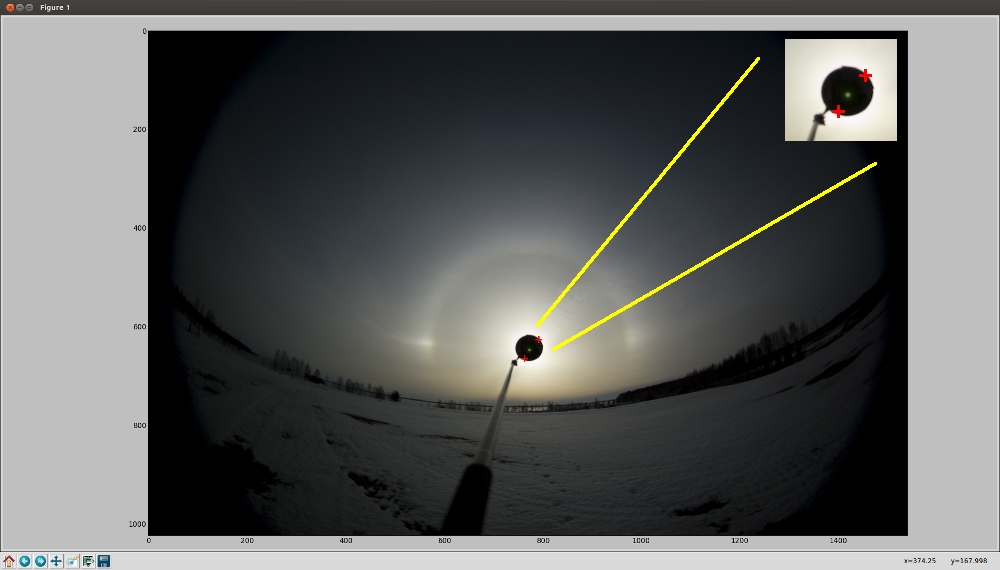
This area needs to be larger than the reference area. In northern hemishphere, the Sun (and Moon) moves towards right, so with a image series photographed using a tripod we don’t need to add much extra area on the left side of the reference. There’s a tradeoff in the area size: The smaller the area is, the faster the alignment will be. But if the area is too small, the reference might not be inside the area, and that image will not be used in the stack. Or even worse, there’s a similar area with good enough correlation and that feature is selected, ruining the whole stack.
Alignment can benefit from multiple processors, see -p
command-line option.
Command-line options
python bin/halostack_cli.py [options] <list of filenames>
-a, --average-stack-a average_stack.png- output filename of the average stack
-m, --min-stack-m minimum_stack.png- output filename of the minimum stack
-M, --max-stack-M maximum_stack.png- output filename of the maximum stack
-d, --median-stack-d median_stack.png- output filename of the median stack
-t, --correlation-threshold-t 0.9- minimum required correlation
- default:
0.7
-s, --save-images-s aligned_images_- save aligned images as PNG with the given filename prefix
- this will save the images with filenames like
aligned_images_IMG_0001.pngetc.
-n, --no-alignment-n- stack without alignment
- no arguments
-e, --enhance-images-e gradient:20- enhancement functions applied to each input image before alignment and stacking
- can be called several times
- processing is done in the given order
-E, --enhance-stacks-E usm:25,2- enhancement functions applied to each stack
- can be called several times
- processing is done in the given order
-g, --view-gamma-g 1.5- adjust image gamma for alignment preview
- default:
1.0
-C, --config-C config.ini- use config file <file>
-c, --config_item-c default- select the config item to use
-p, --nprocs-p <num>-p 4- set number of processors to use in computationally intensive tasks
such as
- alignment
- gradient removal (blurring)
- default:
1 - unfortunately, in Windows you are limited to one thread
<list of filenames>*.jpgimages/*.*IMG_0001.jpg IMG_0002.jpg IMG_0003.jpg
Configuration file
Everything that can be set with the command-line options can also be setup in a configuration file. Command-line options will override settings obtained from the configuration file.
Below is an example configuration:
# average stack from raw/tiff images with view gamma set
[avg_from_raw]
avg_stack_file = average.png
view_gamma = 1.5

# average stack from linear raw/tiff images with view gamma set
# and USM applied to the stack
[avg_from_raw]
avg_stack_file = average.png
view_gamma = 1.5
enhance_stacks = usm:25,2

# B-R processing without stacking
[br]
avg_stack_file = ave_stack_with_br.png
no_alignment = True
enhance_stacks = gradient br
These pre-set configurations can be used like this:
$ halostack_cli.py -C <configuration file> -c <config item>
For example, using the B-R configuration defined above:
$ halostack_cli.py -C config.ini -c br
Image processing options
This tries to be a complete list of image pre- and post-processing
options available in Halostack. These enhancements can be applied
using -e and -E command-line switches, or corresponding
configuration file options enhance_images and enhance_stacks.
All the examples on the green background are used in conjunction with
these switches (eg. -e br) or given in configuration file.
It is recommended that ImageMagick based methods are used before Numpy based in preprocessing, and vice versa in postprocessing. In this way there’s less switching between floating point (Numpy) and integer (ImageMagick) datatypes and less loss in data.
ImageMagick based methods
These methods rely on ImageMagick processing functions. For these to work, the image data needs to be converted to a format recogniced by ImageMagick, so some of the otherwise available data may be lost if the data was previously manipulated using floating point operators.
Unsharp mask
Unsharp mask, or USM in short, is a way to enhance halos by increasing
the image contrast. USM is mostly used in postprocessing with
-E command-line switch, but some use it also in preprocessing.
The user can give the USM four parameters:
- radius of the applied Gaussian blur in pixels
- this should be about the same as the dimension of the halos, eg. the width of parhelic circle
- amount
- fraction of the difference between the original and the blurred image that is added back into the original
- start testing with values around
4or5
- sigma
- standard deviation of the Gaussian in pixels
- optional, defaults to
sqrt(radius)
- threshold
- threshold above which the USM is applied
- given as a fraction of the maximum pixel value
0.05would mean pixel values above 11.8 for 8-bit and 3275.8 for 16-bit images
- optional, defaults to
0.0meaning that USM is applied everywhere
The syntax is:
-E usm:radius,amount,sigma,threshold
where sigma and threshold are optional:
-E usm:25,5
-E usm:30,4,15
-E usm:40,5,20,0.05
Emboss
Emboss makes a relief of the image based on local contrast. In some
cases this can show the halos more clearly. Emboss is used in
postprocessing with -E command-line switch.
Syntax:
-E emboss:azimuth,elevation
where azimuth (default: 90) and elevation (default:
10) are optional arguments giving the location of the light
source in degrees.
Syntax:
-E emboss
-E emboss:90
-E emboss:90,20
The smaller the elevation value, the longer the “shadow” is behind the halos and the higher the contrast. The azimuth can be adjusted to best effect to reflect the orientation of the halos.
Use of linear stretching (stretch, see below) is usually helpful:
-E emboss -E stretch
Numpy based methods
These methods are written using mathematical functions available in the Numpy Python library.
Blue - Red
This method is described in detail by Lefadeux. In short, the idea is to reduce the effect of the background to enhance the colorful (non-white) halos by subtracting red channel data from the appropriately scaled blue channel.
Blue - Red is a postprocessing method.
In Halostack, the procedure is highly automatized, but the user still has some possibilities to make adjustments. The basic usage is to let Halostack determine the scaling value (restricted to be between 1.5 and 2.5):
-E br
It is also possible to give the multiplier:
-E br:1.5
To make the iteration by trial-and-error a bit faster, it is suggested to check what is the initial estimate from the automatic version.
Green - Red
The Green - Red method is otherwise equal to the Blue - Red method described above, but in this case the first channel is different. May yield better results thatn Blue - Red in some cases.
Syntax:
-E gr
-E gr:1.5
Blue - Green
The Blue - Green method is otherwise equal to the Blue - Red method described above, but in this case the channels re different. This method can be handy when trying to reveal the fifth order rainbow between the primary and secondary rainbows.
Syntax:
-E bg
-E bg:1.5
Gradient removal
Sky tends to have gradients. This method tries to reduce their effect by applying a Gaussian blur to the luminance of the image and subtracting this from all the color channels. Although each image has different gradients, it is better to apply this method only in postprocessing so that the images stay similar. By default the blur radius is 1/20th of the smaller image dimension and the standard deviation (sigma) 1/3rd of the radius:
-E gradient
The radius can be given as a parameter:
-E gradient:50
as well as the standard deviation of the kernel:
-E gradient:50,20
The smaller the sigma is, the smaller the influence of the more remote values are. The default of 1/3rd of the radius seems to work well.
Gradient removal benefits from using multiple processors, see -p
command-line parameter.
Luminance subtraction
Luminance subtraction is also described in the magnificient article by Lefadeux. The implementation generates a image by subtracting the luminance (average of the color channels) from the whole image. No arguments are used. Luminance subtraction is a postprocessing method.
Syntax:
-E rgb_sub
RGB mixing
To augment the Luminance subtraction, it is also possible to directly
mix the luminance subtracted image with the original image to generate
more “eye friendly” and natural looking images that show colorful
halos better. The mixing ratio can be given, and if omitted, value of
f = 0.7 is used.
image = (1-f) * original + f * rgb_sub
Syntax:
-E rgb_mix
-E rgb_mix:0.5
Linear stretching
In many cases the image data has lots of “empty” in both ends of the histrogram. With this method, it is possible to truncate the data so that more of the useful data is retained in the output image. User can supply the fractions of the histogram that are truncated at each end.
If the values are not given, 1 % (or ratio of 0.01) of
the data is cut from each end:
-E stretch
which is equal to:
-E stretch:0.01,0.99
If only one value is given, the higher value is complement of this value, eg.:
-E stretch:0.02
is equal to:
-E stretch:0.02,0.98